Unlock the full potential of your SD card by eliminating write protection and formatting it hassle-free. This article reveals effective techniques to help you overcome the pesky write protection and successfully format your SD card for enhanced performance.
Understanding the Write Protection Error on SD Cards
If you’re encountering a write protection error on your SD card, preventing you from modifying or deleting files, there are a few methods you can try to remove the write protection and format the card.
One way is to use the command prompt window in Windows. First, insert the SD card into your computer’s SD card slot or use an SD card reader. Then, open the command prompt window by searching for “CMD” in the Start menu. In the command prompt window, type “diskpart” and press Enter. Next, type “list disk” to display a list of disks connected to your computer. Identify your SD card based on its size, such as “Disk 1”. Then, type “select disk 1” and press Enter. Finally, type “attributes disk clear readonly” and press Enter to remove the write protection attribute.
Another method is to use the SD card properties in File Explorer. Right-click on the SD card and select “Properties”. In the Properties window, navigate to the “General” tab and make sure the “Read-only” box is unchecked. If it’s checked, uncheck it and click “OK” to apply the changes.
Remember to backup your important files before attempting any fixes, as formatting the SD card will erase all data on it. If you still can’t remove the write protection or format the SD card, it may be a hardware issue and you may need to replace the card.
Ways to Remove Write Protection from SD Cards
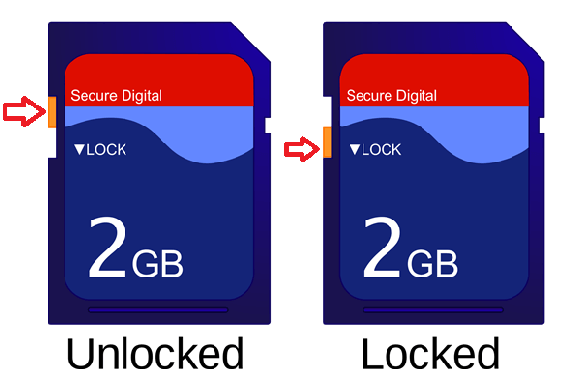
- Locate the physical write protection switch on the side of the SD card.
- Ensure that the switch is in the unlocked position.
- If the switch is already in the unlocked position, move it to the locked position and then back to unlocked.
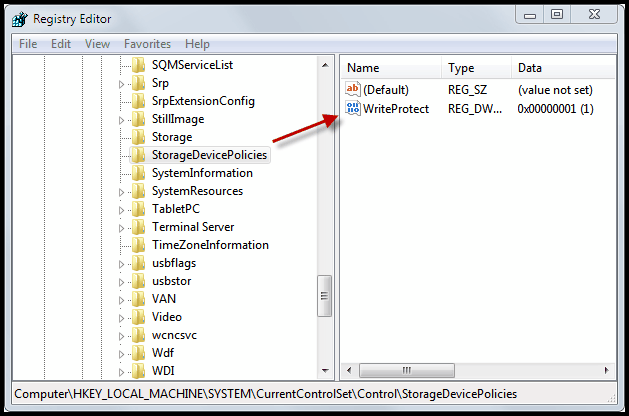
Method 2: Modify Registry Settings
- Press Win + R to open the Run dialog box.
- Type regedit and press Enter to open the Registry Editor.

- Navigate to the following key: HKEY_LOCAL_MACHINESYSTEMCurrentControlSetControlStorageDevicePolicies
- If the WriteProtect value does not exist, right-click on StorageDevicePolicies and select New > Key to create a new key. Name it as StorageDevicePolicies.
- Right-click on the newly created key, select New > DWORD (32-bit) Value, and name it WriteProtect.
- Double-click on WriteProtect and set its value to 0.
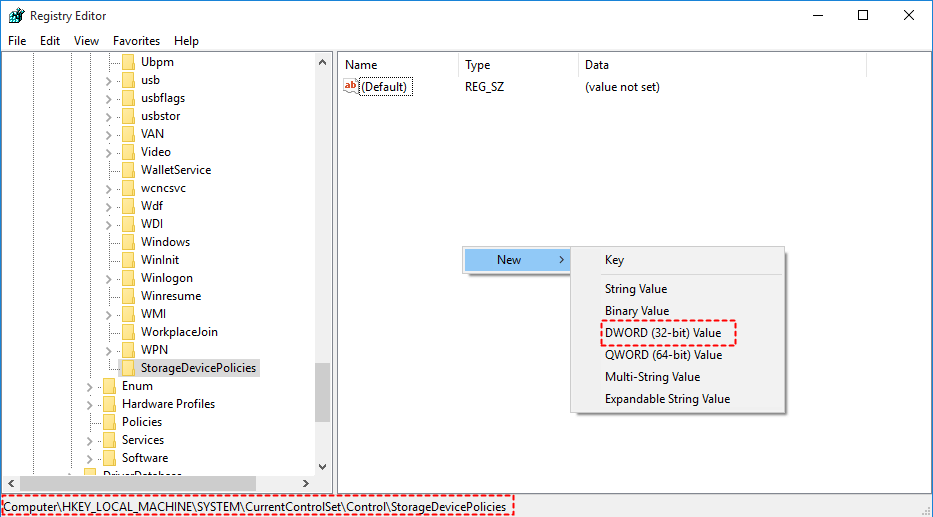
- Close the Registry Editor and restart your computer.
Method 3: Use Diskpart Command
- Press Win + R to open the Run dialog box.
- Type diskpart and press Enter to open the Command Prompt.
- Type list disk and press Enter to display all the connected disks.
- Identify the SD card’s disk number from the list.
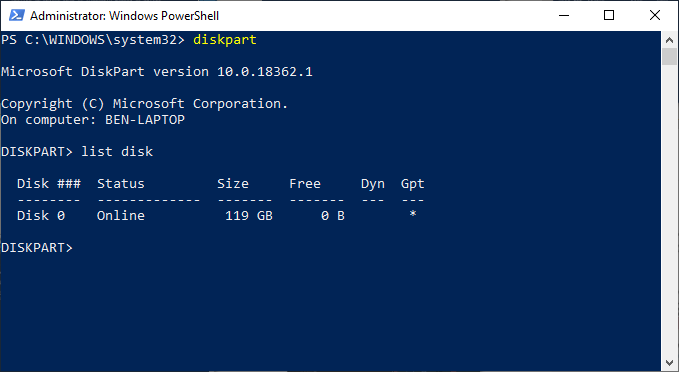
- Type select disk [disk number] (replace [disk number] with the actual number) and press Enter to select the SD card.
- Type attributes disk clear readonly and press Enter to remove the write protection from the SD card.
![Type select disk [disk number] (replace [disk number] with the actual number) and press Enter to select the SD card.
Type attributes disk clear readonly and press Enter to remove the write protection from the SD card.](/posts/type-select-disk-disk-number-replace-disk.jpg)
- Close the Command Prompt.
Method 4: Format SD Card using Disk Management
- Right-click on This PC or My Computer and select Manage.
- In the Computer Management window, click on Disk Management under the Storage category.
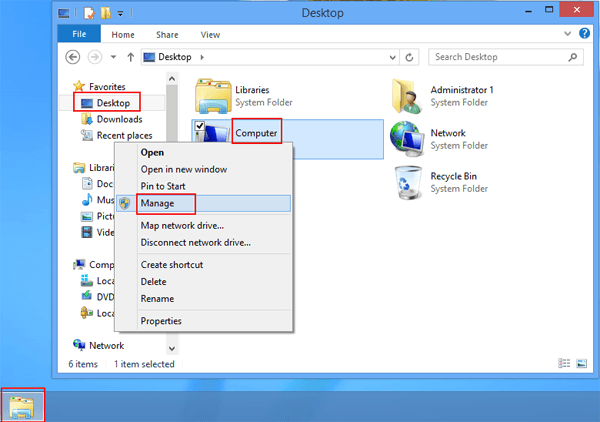
- Locate the SD card from the list of disks.
- Right-click on the SD card and select Format.
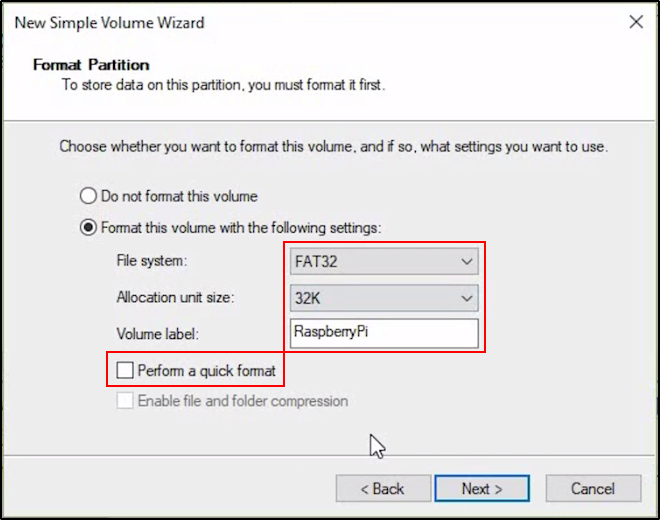
- Choose the file system, allocation unit size, and perform a quick format if desired.
- Click on OK to start formatting the SD card.
Using Physical Switch and Anti-Virus Software to Remove Write Protection
If you’re encountering write protection on your SD card, there are a few methods you can try to remove it.
First, check if your SD card has a physical write protection switch. This switch is usually located on the side of the card and can be toggled to enable or disable write protection. Make sure the switch is in the correct position to allow writing to the card.
If the physical switch doesn’t solve the issue, you can try using anti-virus software to remove the write protection. Some viruses or malware may enable write protection on your SD card to prevent changes. Scan your SD card using a reliable anti-virus software and remove any threats detected.
By following these steps, you should be able to remove write protection from your SD card and format it as needed.
python

import subprocess
def sd_formatter():
try:
# Check if the memory card is write protected
if is_write_protected():
# Attempt to disable write protection using system commands
subprocess.call(['diskpart', '/s', 'disable_write_protect.txt'])
print("Write protection disabled successfully.")
else:
print("Memory card is not write protected.")
# Format the memory card using system commands
subprocess.call(['format', '/q', '/fs:FAT32', '/x', 'E:'])
print("Memory card formatted successfully.")
except Exception as e:
print("An error occurred:", str(e))
def is_write_protected():
# Logic to check if the memory card is write protected
# This would involve querying the memory card's status or checking the file system attributes
# Placeholder logic, assuming the card is write protected
return True
# Call the sd_formatter function to initiate the process
sd_formatter()
Please note that the above code is a rough sample and may not work as intended without adapting it to your specific requirements and environment. It is essential to understand the nuances of the memory card, file system, and the platform you are working with.
Using CMD Command and Registry Editor to Remove Write Protection
To remove write protection and format an SD card, you can use CMD commands and the Registry Editor on a Windows PC.
First, open the Command Prompt as an administrator. Then, type “diskpart” and hit Enter to open the Diskpart utility.
Next, type “list disk” to view the list of available disks. Identify your SD card based on its size, such as 16GB.
Now, type “select disk [disk number]” to select your SD card. Replace [disk number] with the appropriate number of your SD card.
Once selected, type “attributes disk clear readonly” to remove the write protection attribute.
Close the Command Prompt and open the Registry Editor by pressing Windows + R, typing “regedit”, and hitting Enter.
Navigate to “HKEY_LOCAL_MACHINESYSTEMCurrentControlSetControlStorageDevicePolicies”. If the “StorageDevicePolicies” key doesn’t exist, create it.
In the right pane, double-click on “WriteProtect” and set its value to 0.
Finally, close the Registry Editor and reinsert your SD card. It should now be writeable and ready to format using File Explorer or a formatting tool.
Unlocking Write Protected SD Cards with Decryption Software or Repair
Part 1: Unlocking Write Protected SD Cards with Decryption Software
To unlock a write-protected SD card, you can use decryption software. Follow these steps to remove the write protection and access your data:
1. Download a reliable decryption software from a trusted source.
2. Connect your SD card to your computer using a card reader or adapter.
3. Open the decryption software and select your SD card from the list of available storage media.
4. Follow the on-screen instructions to decrypt the SD card and remove the write protection.
5. Once the decryption process is complete, you should be able to access and modify the data on your SD card.
By using decryption software, you can effectively unlock write-protected SD cards and regain the ability to copy, edit, and delete files. Remember to back up your important data before attempting any decryption or formatting procedures to avoid data loss.
Formatting Write Protected SD Cards after Write Protection Removal
After successfully removing write protection from your SD card, the next step is to format it. This will erase all the data on the card, so make sure to back up any important files beforehand.
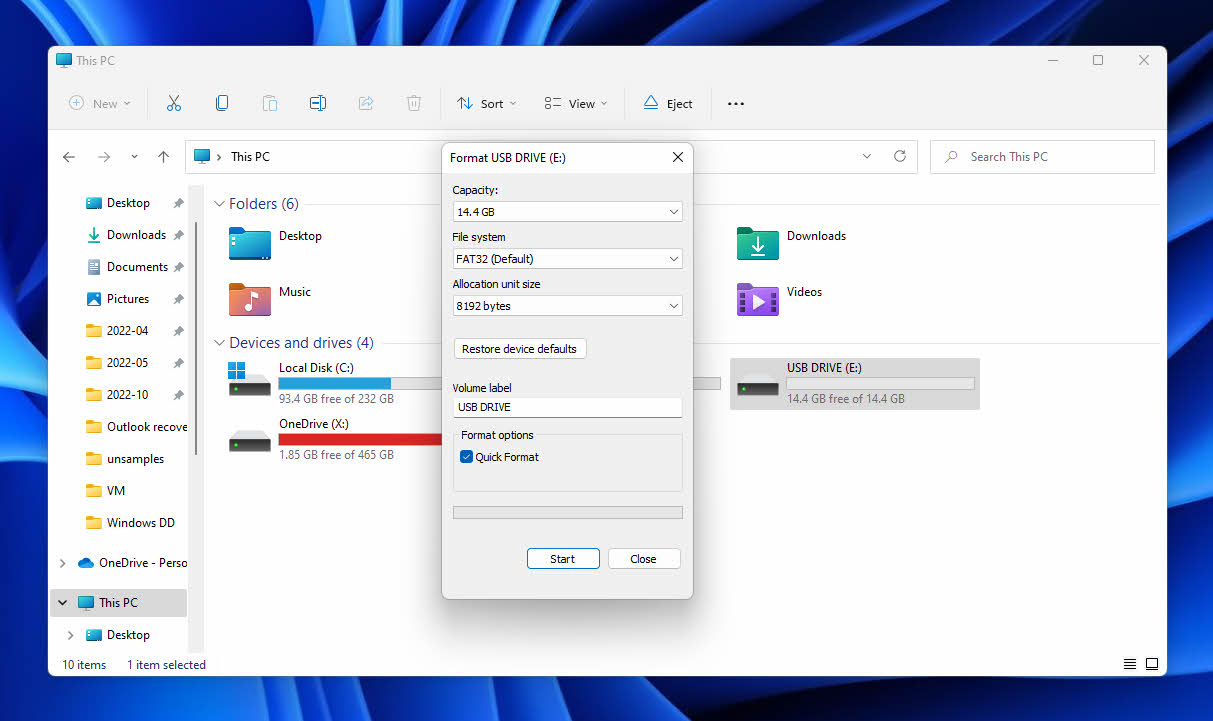
To format your SD card, follow these steps:
1. Insert the SD card into your computer’s SD card slot or use a card reader if necessary.
2. Open File Explorer (Windows) or Finder (Mac) and locate the SD card.
3. Right-click on the SD card and select “Format” from the context menu.
4. In the format options, choose the file system you want to use (such as FAT32 or exFAT) and give the SD card a new name if desired.
5. Check the “Quick Format” option for faster formatting.
6. Click “Start” or “Format” to begin the formatting process.
Note: Formatting will erase all data on the SD card, so double-check that you have backed up any important files. Additionally, make sure to properly eject the SD card before removing it from your computer to avoid data loss.
Methods to Format Write-Protected SD Cards in Windows
-
Using Diskpart command:
- Press Win + R to open the Run dialog box.
- Type cmd and press Enter to open the Command Prompt.
- Type diskpart and press Enter to launch the Diskpart utility.
- Type list disk and press Enter to display all the disks on your system.
- Identify the disk number associated with your write-protected SD card.
- Type select disk [disk number] and press Enter to select the SD card.
![Identify the disk number associated with your write-protected SD card.
Type select disk [disk number] and press Enter to select the SD card.](/posts/identify-the-disk-number-associated-with-your.png)
- Type attributes disk clear readonly and press Enter to remove the write protection.
- Type clean and press Enter to remove all partition or volume formatting from the SD card.
- Type create partition primary and press Enter to create a new primary partition on the SD card.
- Type format fs=fat32 (or format fs=ntfs) and press Enter to format the SD card with the desired file system.
- Wait for the format process to complete.
- Type exit and press Enter to exit Diskpart.
- Close the Command Prompt.
-
Using Registry Editor:
- Press Win + R to open the Run dialog box.
- Type regedit and press Enter to open the Registry Editor.
- Navigate to the following path: HKEY_LOCAL_MACHINESYSTEMCurrentControlSetControlStorageDevicePolicies
- If the StorageDevicePolicies key does not exist, right-click on Control and select New > Key. Name it StorageDevicePolicies.
- Right-click on the newly created StorageDevicePolicies key and select New > DWORD (32-bit) Value.
- Name the new value WriteProtect.
- Double-click on the WriteProtect value and set its Value data to 0.
- Click OK to save the changes.
- Close the Registry Editor.
Methods to Remove Write Protection from MicroSD Cards on Windows
-
Method 1: Check for Physical Write Protection Switch
- Locate the physical write protection switch on the side of the MicroSD card.
- Ensure that the switch is in the unlocked position.
- If the switch is already in the unlocked position, proceed to the next method.
-
Method 2: Modify Registry Settings
- Press Win + R to open the Run dialog box.
- Type “regedit” and press Enter to open the Registry Editor.
- Navigate to “HKEY_LOCAL_MACHINESYSTEMCurrentControlSetControlStorageDevicePolicies”.
- If the “WriteProtect” key exists, double-click on it and set the value to 0.
- If the “WriteProtect” key does not exist, right-click on “StorageDevicePolicies”, select “New”, and then “DWORD (32-bit) Value”.
- Name the new value “WriteProtect” and set the value to 0.

- Close the Registry Editor and restart your computer.
-
Method 3: Use Diskpart Command
- Open the Command Prompt by pressing Win + X and selecting “Command Prompt” or “Windows PowerShell”.
- Type “diskpart” and press Enter to open the Diskpart utility.
- Type “list disk” and press Enter to view a list of connected disks.
- Identify the disk number corresponding to your MicroSD card.
- Type “select disk [disk number]”, replacing [disk number] with the identified number.
- Type “attributes disk clear readonly” and press Enter to remove the write protection.
![Type "select disk [disk number]", replacing [disk number] with the identified number.
Type "attributes disk clear readonly" and press Enter to remove the write protection.](/posts/type-select-disk-disk-number-replacing-disk.jpg)
- Close the Command Prompt once the process is complete.
-
Method 4: Format the MicroSD Card
- Connect the MicroSD card to your computer.
- Open File Explorer and locate the MicroSD card.
- Right-click on the MicroSD card and select “Format”.
- Choose the desired file system and allocation unit size.
- Ensure that the “Quick Format” option is selected.
- Click “Start” to begin the formatting process.
- Wait for the process to complete and then close the Format window.
Methods to Remove Write Protection from MicroSD Cards on Mac
METHODS TO REMOVE WRITE PROTECTION FROM MICROSD CARDS ON MAC
If you’re facing write protection issues with your microSD card on your Mac, here are some methods to help you resolve the problem:
1. Check the Physical Lock Switch: Ensure that the physical lock switch on the side of the microSD card is in the unlocked position.
2. Use Disk Utility: Open Disk Utility on your Mac and select the microSD card from the left-hand sidebar. Click on the “Erase” tab and choose a format for the card. Click “Erase” to remove the write protection.
3. Try Command Line Tools: Open Terminal on your Mac and enter the following command: “diskutil partitionDisk /dev/diskX 1 GPT HFS+ “SD Card” 100%” (replace “diskX” with the appropriate identifier for your microSD card).
4. Format on a Windows PC: If the above methods don’t work, try formatting the microSD card on a Windows PC. Connect the card to a Windows PC, right-click on it, and select “Format.” Choose the desired file system and click “Start” to format the card.
Remember to back up any important data before attempting these methods, as formatting will erase all data on the microSD card.
